- Temperature dependence of elastic and shear modulus, poisson ratio and ultrasonic wave velocity of electroless nickel-coated composites
Ahmet Yönetkena,*, Vildan Özkan Bilicib and Ayhan Erolc
aAfyon Kocatepe University, Faculty of Technology, Mechatronics Engineering, 03200 Afyonkarahisar, Turkey
bAfyon Kocatepe University, Science and Literature Faculty, Physics Dept., 03200, Afyonkarahisar, Turkey
cAfyon Kocatepe University, Technology Faculty, Metallurgy and Materials Engineering Dept., 03200 Afyonkarahisar, TurkeThis article is an open access article distributed under the terms of the Creative Commons Attribution Non-Commercial License (http://creativecommons.org/licenses/by-nc/4.0) which permits unrestricted non-commercial use, distribution, and reproduction in any medium, provided the original work is properly cited.
There are many factors affecting the production process depending on the raw materials, equipment and technology used in the production of composite materials. Reaching the desired density and strength of the product to be obtained is possible with appropriate arrangements and reinforcements to be made at every stage. Composite materials that combine more than one feature are produced in material groups. In this study, composite production was made with nickel-based (0.4% BN ceramic + 27.07% Astaloy CrM metallic) + 72.53%Ni powders by applying electroless nickel plating process, and these metallic and ceramic powders were used for reinforcement. After these samples were shaped circularly in a uniaxial cold press, they were sintered in an argon atmosphere conventional furnace at 1000, 1100, 1200, 1300 and 1400 °C for two hours. The mechanical and ultrasonic properties of the composite samples obtained with the addition of nickel-coated ceramic and metallic powder without electric current were determined. The effect of changing the sintering temperatures of Ni-based composite samples on ultrasonic properties was measured by ultrasonic pulse echo method. The sintering temperature was found to be one of the most effective factors on the propagation velocity of ultrasonic waves, Young's modulus and shear modulus, Poisson ratio. At the same time, Young's modulus and shear modulus and Poisson ratios changed depending on the propagation velocity of the ultrasonic waves. In addition, the results obtained by XRD analysis and SEM (Scanning Electron Microscopy) metallographic evaluation on the composite samples were supported
Keywords: Elastic modulus, Sintering temperature, Ultrasonic velocity, Poisson ratio, Hardness
As a result of industrial developments, the need for new, lighter and more durable materials comes with it every day. In this context, composite materials are the leading material groups [1]. At the same time, one of the important factors in the progress and growth of powder metallurgy is the production and development of more cost-effective powder varieties to create high-yield raw material parts.
Electroless coating is a technique of coating on metal, ceramic or polymer surfaces by using the autocatalytic chemical reduction method of atoms without using electric current, and it is used in the production of materials to obtain products with superior properties and homogeneous distribution [2, 3]. Nickel coatings are obtained as a result of the conversion of nickel ions into nickel metal by the effect of a reducer on a surface conductive or catalytic material immersed in a solution containing nickel salts. Autocatalytic electroless coatings, which are an alternative to electrolytic coatings and do not require any external electricity, are used in many industrial areas. Obtaining a homogeneous coating thickness, high hardness, good corrosion and wear resistance make electroless coatings very common. In addition, it is among the advantages that it can be applied to parts with complex shapes [4-7]. By combining the powder metallurgy method and electroless nickel plating technique, new composite samples with superior properties were obtained [8-11]. Astaloy CrM alloy powder is one of the iron powders produced by the world's largest iron powder producer Högenas (Sweden), where Cr is used as a pre-alloy [12-16]. High efficiency parts produced by powder metallurgy have gained great importance in the expansion of the powder metallurgy products industry in terms of both production cost and keeping physical and mechanical properties under control [17].
The aim of the study is to strengthen and increase the strength of the pre-alloyed Astaloy CrM powder, which is preferred as a casting material such as iron and steel in the powder metallurgy industry, with the addition of BN ceramic powders. In addition, the characterization of the properties of the new material obtained by the ultrasonic test technique, which is the most preferred NDT technique, is to examine. Changes in one or more of the ultrasonic parameters such as transit time, attenuation, scattering and frequency content, which can be easily measured with the propagation of a high frequency sound wave in an object, can be associated with changes in physical and mechanical properties such as hardness, ultrasonic velocity, elastic modulus, density, reinforcement content, homogeneity or grain structure [18-23]. Gür [24] produced pressed samples containing different volume and size combinations of pure Al and SiC particles. In the results obtained, it was observed that the velocity of ultrasonic waves increased with the increase of SiC content in the sample and the propagation velocity of ultrasonic waves was affected by porosity. El-Daly et al. [25] evaluated the structural and elastic properties of Al-based metal matrix nanocomposites depending on the reinforcement content using the ultrasonic velocity technique. The results showed that the longitudinal wave and transverse wave velocities increased with the increase in reinforcement content. Based on the measured ultrasonic wave velocities, the Poisson ratio and Young's and shear modulus were effectively calculated. It was observed that both hardness and ultrasonic modulus increased as the Poisson ratio of the nanocomposite decreased. Yassene et al. [26] used grafted marble and granite powders as fillers of epoxy composites in a similar way and added them at different rates. In their experiments, it was observed that ultrasonic longitudinal and transverse wave velocities increased with the increase in the amount of marble and granite and there was a linear relationship. It was determined that the elastic properties of grafted marble and granite composites increased more than the non-grafted composites, and at the same time, the increase in microhardness increased the rigidity. Dia et al. [27] also investigated the effects of stress and temperature on the propagation velocity of ultrasonic longitudinal waves in polymers. As expected, it was observed that the ultrasonic wave velocity changed linearly with stress and temperature, and the temperature effect was as important as the acoustoelastic effect. In addition, this situation shows that the material temperature effect should be taken into account when the microstructural properties of a material are examined. Bolotina et al. [28] developed the ultrasonic pulse echo technique, one of the preferred methods for finding cracks and defects that limit the structural integrity of technical components and systems, by experimenting with two different methods.
This study has been prepared in the light of the information obtained by reviewing the existing literature and doing the necessary research. In this study, "(0.4% BN ceramic + 27.07% Astaloy CrM metallic) + 72.53% Ni" composite samples were obtained by powder metallurgy method and electroless nickel plating technique. At the same time, the effect of electroless Ni coating on the properties of BN ceramic and Astaloy Cr-M metallic powders used as additives in nickel-based composites will be determined. At the same time, quantitative information will be obtained about the effect on the elastic properties of the composites obtained by using the ultrasonic pulse echo method. The variation of elastic properties such as ultrasonic longitudinal and transverse velocities, densities, hardness, Young's and shear modulus and Poisson's ratio within the structure were investigated. In general, it is hoped that the results will be useful both in the further development of new composites for different industrial and industrial applications, and that ultrasonic techniques that provide fast and non-destructive information can help optimize the quality assurance and process parameters of composites.
Preparation of composites with nickel plating
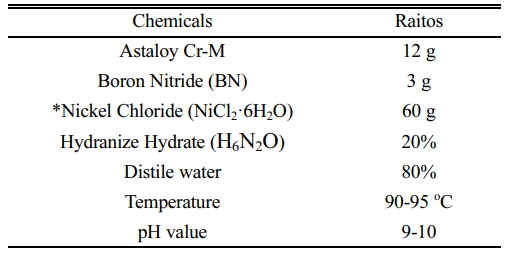
In this study, 99.8% pure BN powders with particle size smaller than 50 μm and commercial Astaloy-CrM powders smaller than 50 μm as metallic powder were used as reinforcement ceramic powder in the production of nickel-based composites. In order to improve the mechanical properties of Astaloy-CrM powder used in the foundry industry and BN powders were added. These powders were mixed mechanically and homogenized. In this study, electroless Ni plating process was used before sintering to resist corrosive effects and facilitate sintering. BN and Astaloy CrM powders are nickel plated by electroless coating method. Nickel plating processes consist of the following steps, respectively. In addition, the chemical properties used in the coating bath are given in Table 1.
(1) 60 g of NiCl2·6H2O was placed in an 800 ml beaker.
(2) Sensitization in a liquid solution was obtained from 80 ml/l purified water and 20 ml/l Hydrazine Hydrate (H6N2O) for 15 minutes.
(3) 3 gr BN and 12 gr Astaloy Cr-M powder were added to the liquid solution.
(4) The liquid solution is activated with ammonia from time to time.
(5) Activated powders were rinsed in 90-95 °C and 9-10 pH water.
(6) Then all the powders were washed with cold distilled water and acetone, cleaned, dried in an oven and weighed.
After (0.4% BN ceramic + 27.07% Astaloy CrM metallic) + 72.53% Ni composite samples were obtained with electroless nickel plating.
Composite samples are pressed under a pressure of 300 bar in a uniaxial cold press, and then sintered in a tube furnace for approximately 2 hours with multiple heat zone option, offering homogeneous temperature graph in Argon gas atmosphere at 1000 °C, 1100 °C, 1200 °C, 1300 °C and 1400 °C. For microstructural analysis, metallographic properties were evaluated using a Scanning Electron Microscope, model LEO 1430 VP, and an Oxford EDX analyzer. The density of the sintered composite samples was measured with the Archimedes principle in line with the data obtained. The phases and precipitates formed at different sintering temperatures of the nickel-based composite produced with electroless nickel-plated BN ceramic and Astaloy Cr-M metallic powder additives were determined by X-ray diffraction analysis. Bruker Brand D8 Advance model X-ray diffraction (XRD) device can perform point phase analyzes faster, more detailed and by concentrating on specific regions, thanks to its different detectors that can be mounted. The hardness values were determined by using Shimadzu hardness tester under 200 g load, by taking multiple measurements for 10 seconds and determining an average value. At the same time, Sonatest Sitescan 150s ultrasonic flaw detector device was used in the ultrasonic results measured by the pulse echo method.
Ultrasonic Test and Measurements
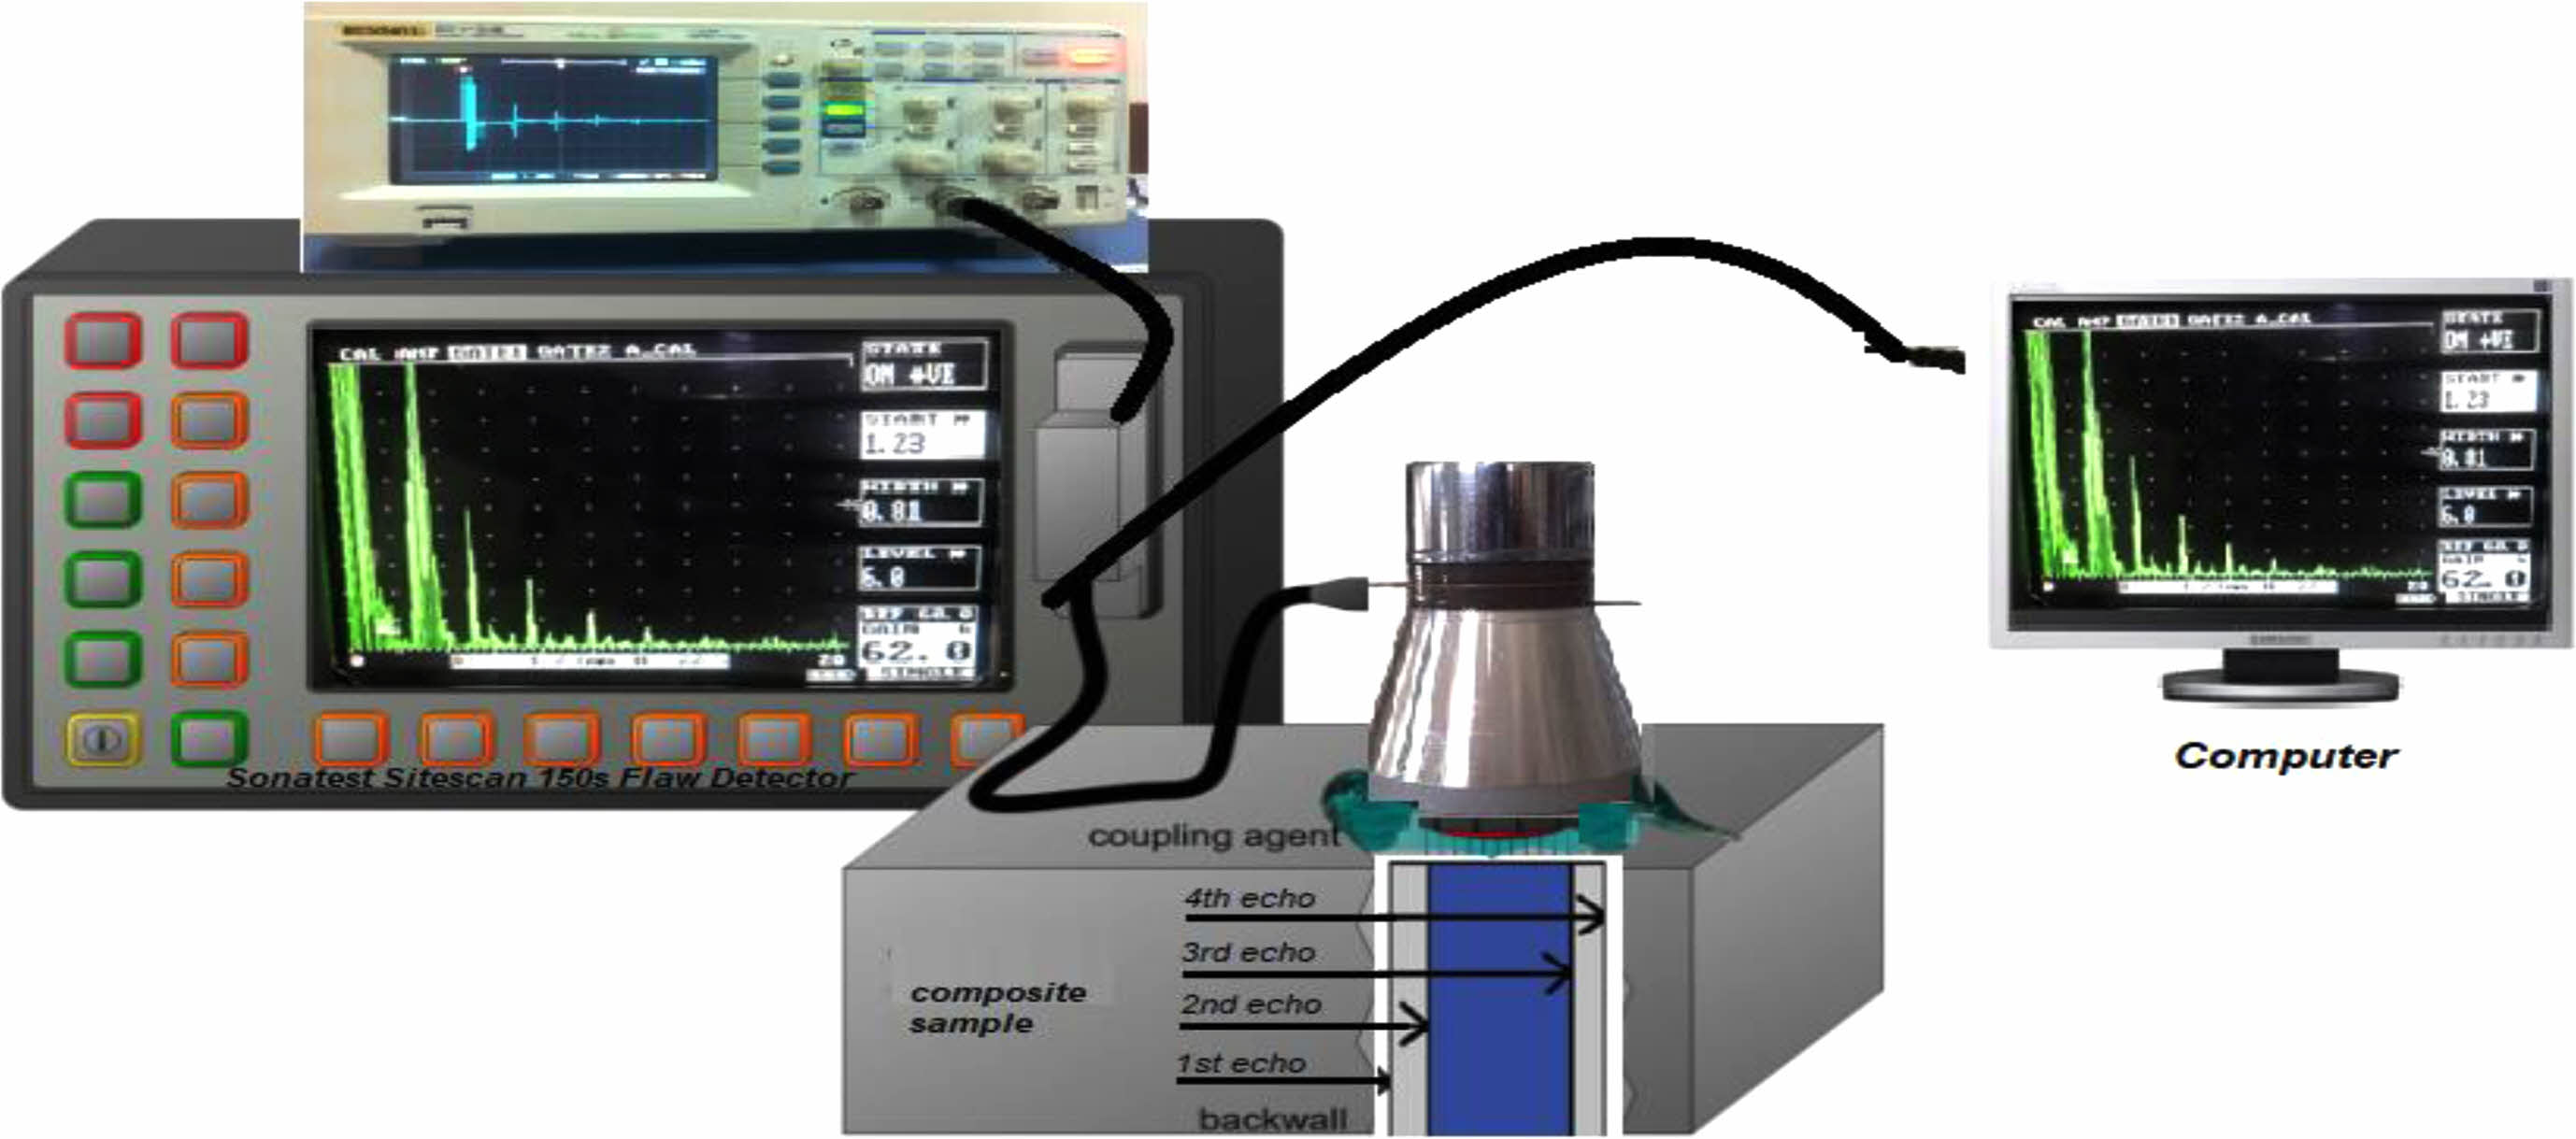
In the study, the pulse echo method, which is one of the ultrasonic test methods, was used to measure the ultrasonic velocity values of the samples sintered at different temperatures and to get detailed information about the contexture without damaging the sample [29-33]. In this study, the ultrasonic pulse-echo technique consists of an ultrasonic flaw detector, a transducer, an oscilloscope, and a computer, as shown in Fig. 1. Sonatest sonagel-W liquid gel was used as the connection between the transducer and the sample.
Ultrasonic Flaw Detector
Pulse-echo technique was used as a single transducer as both transmitter and receiver. As an ultrasonic flaw detector, it was the Sitescan 150s model and has an effective frequency range of 1-10 MHz. In addition to signals that carry the desired information, such as pulses reflected from defects and sub-surface, noise and spurious signals are often displayed on the screens of ultrasonic flaw detectors. The original waveforms were processed by the circuit and developed by connecting directly to the circuit with the oscilloscope. A-, B- and C-scans, which are ultrasonic evaluation methods, are used to investigate different types of defects in materials. It offers one-dimensional defect information from ultrasonic testing to the A-scan evaluation method. With the Oscilloscope view supported by the connections made, the A-scan signal shows the pulse and amplitude against time taken from a point on the surface of the test piece being examined. In this way, the type, size and depth analysis of the defects in the material can be made. The surfaces of the samples were prepared as flat and smooth to ensure the accuracy and consistency of ultrasonic wave velocity measurements. The circular shape and dimensions of the samples were determined as (4 mm × 15 mm). In the measurement of ultrasonic longitudinal and transverse wave velocities, 2 MHz (Sonatest SLH2 10, T/R) receiver/transmitter longitudinal probe and 4 MHz (GE Inspection Technologies MB 4Y) receiver/transmitter transverse probes were used. The propagation velocity of ultrasonic waves through the thickness is given in Eq. (1) [34-38].

In these formulas E, G, ν and ρ values are Young's (elastic) modulus, shear (hardness) modulus, Poisson's ratio and density of the sample, respectively [38-47].
In many studies, the effect of hardness, elastic properties, temperature, compressive strength and particle size on the ultrasonic pulse velocity of the material under investigation has been investigated. These findings obtained in the study are in agreement with the literatüre [48-57].
|
Fig. 1 Experimental schematic diagram of the pulse echo method used for ultrasonic analysis. |
Microstructural investigation
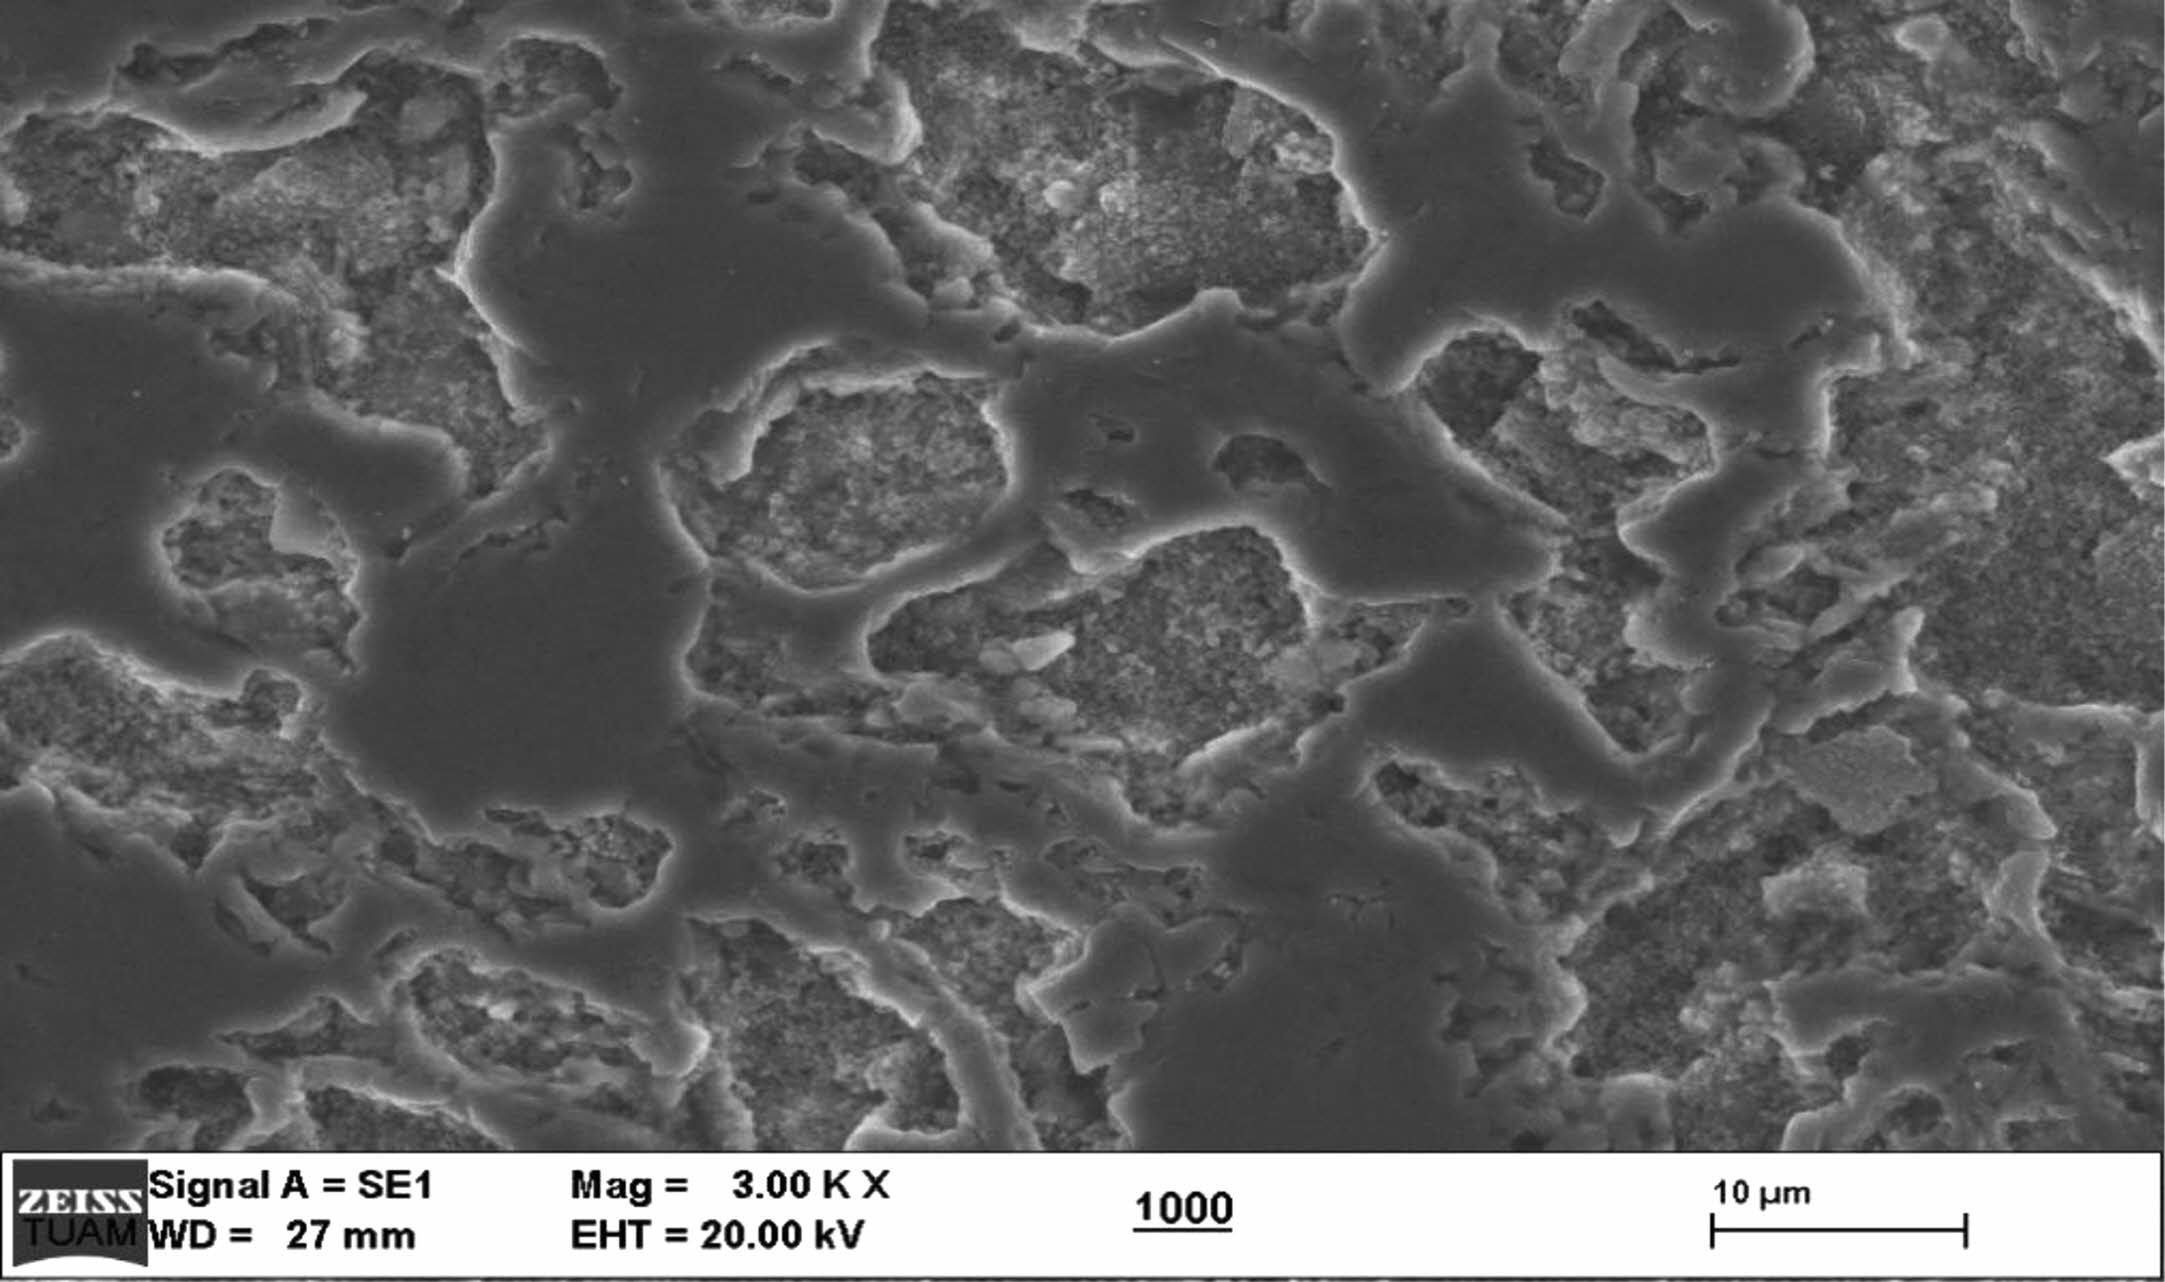
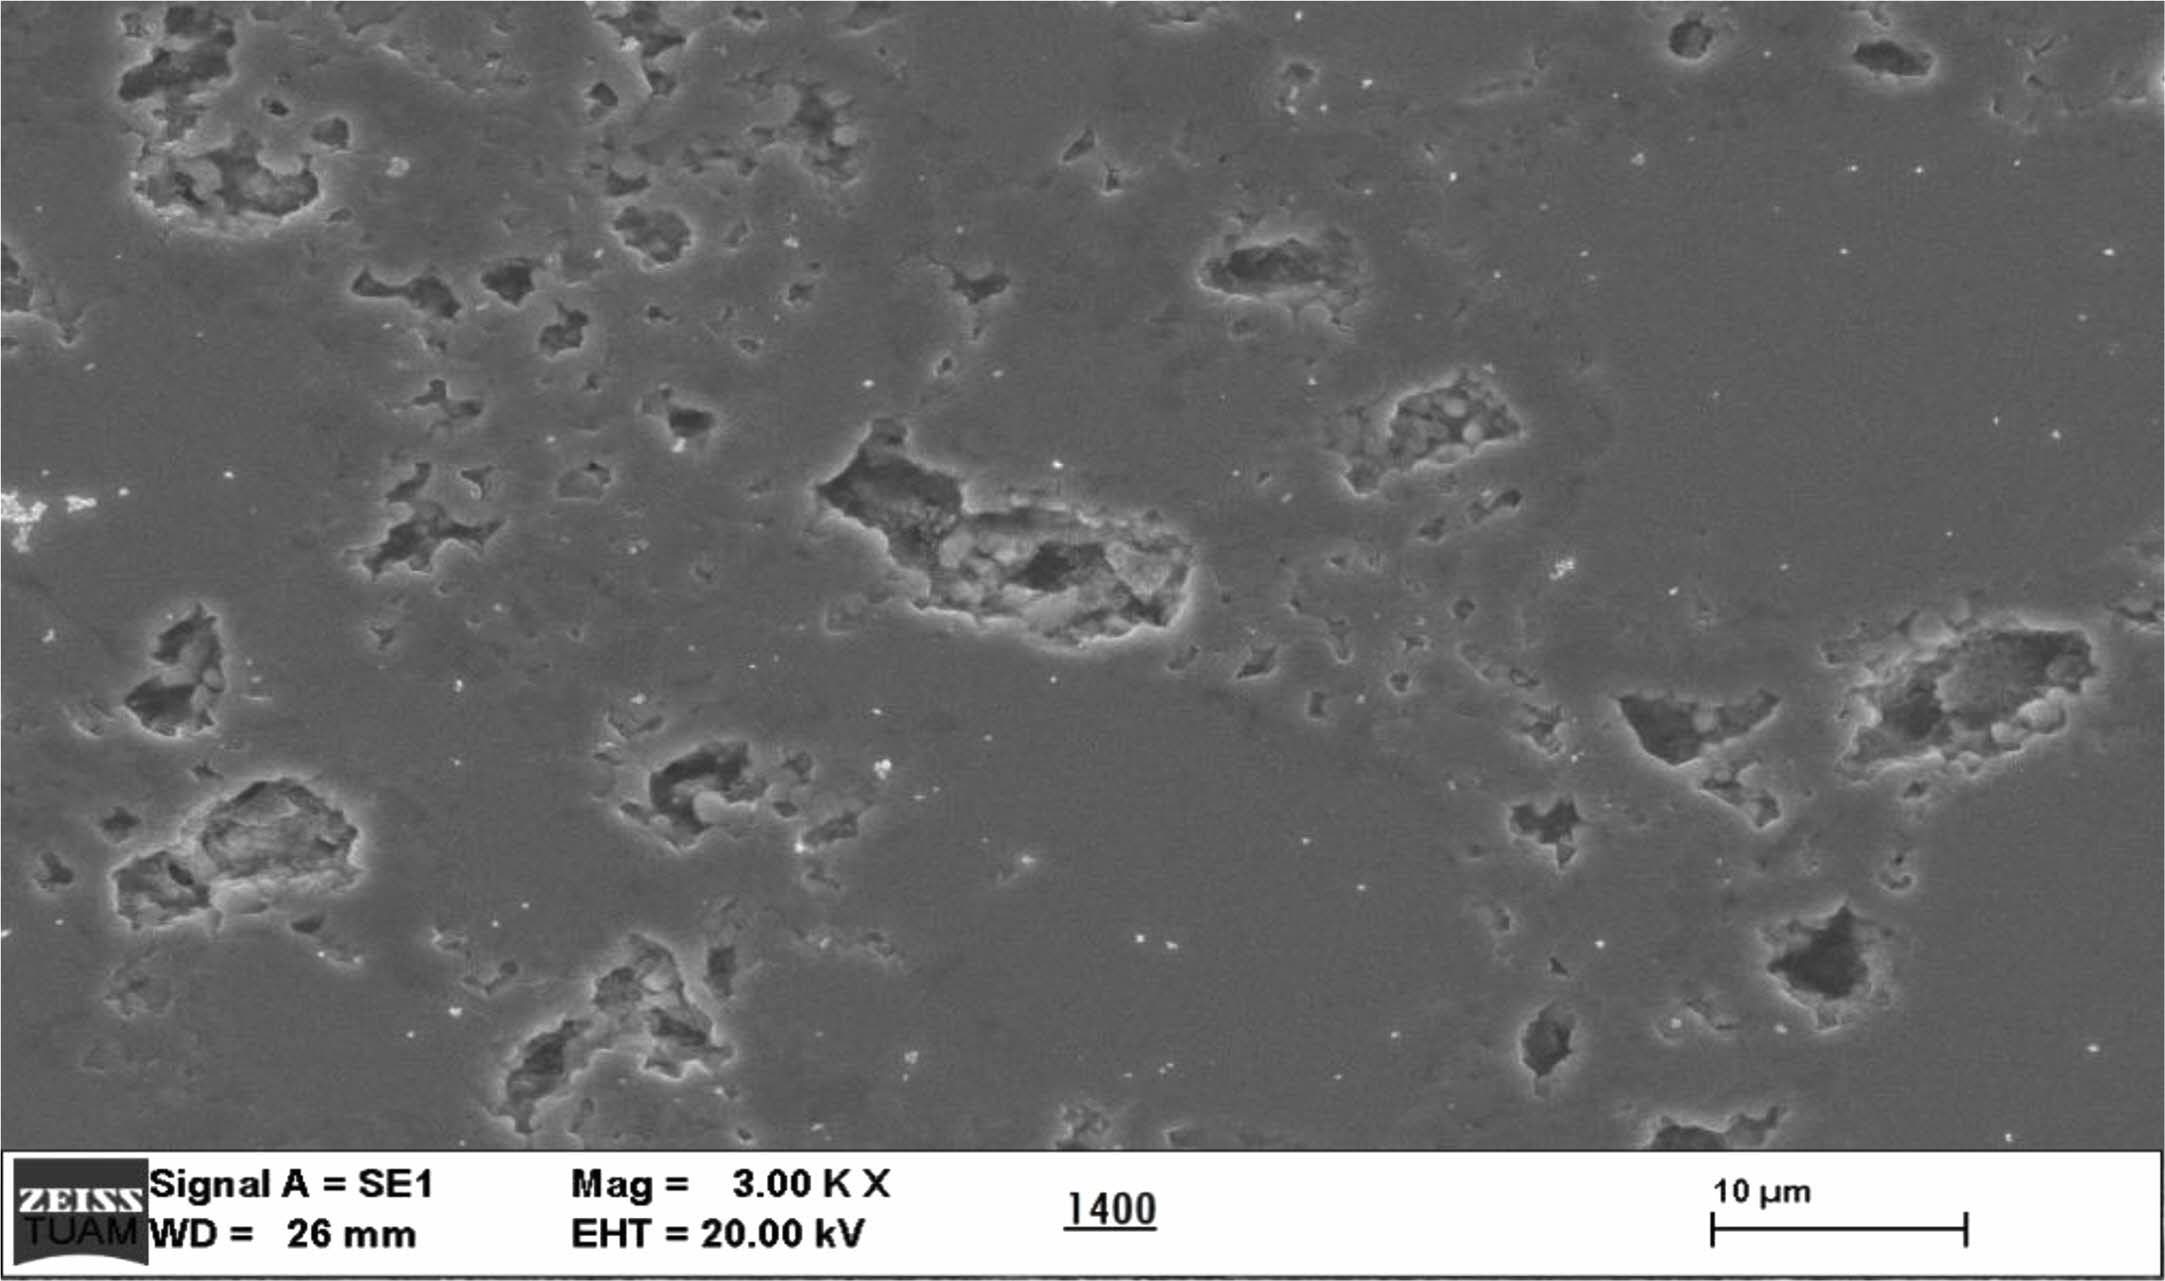
In the microstructure images in Figs. 2 and 3, the reinforcement particles were bonded by solid-state sintering. At the same time, the temperature increase increases the vibration rate of the atoms, causing more neck formation and bonding in the same time. When the microstructure images in Figs. 2 and 3 are examined, it is seen that the reinforcement particles are connected to each other with a neck tie. The amount of porosity and material density are controlled by various process variables, such as sintering temperature and time, alloy additions, and particle size of the starting powders. In the first stage of sintering, the contact area between the powder particles increases, the existing pores in the structure become spherical, the distance between the centers of the particles decreases, and as a result, the density increases and the porosity decreases by pulling on the part. With the increase of sintering temperature, the amount of pores decreases with grain coalescence at all temperatures. When the studies were examined, it was stated that the densities of T/M parts increased with the sintering process, and a decrease in the distances between the powder grains and the amount of pores occurred [58-61]. There are pores that surround these particles and are homogeneously present in the structure. It is also obvious that the particles are getting larger and their sizes are coarser. Considering the sintering temperatures of 1000 °C and 1400 °C, it is clearly seen that the amount of pores decreased with the increase in sintering temperature. Therefore, the low porosity of the composite sample sintered at 1400 °C for two hours means that it has a high density.
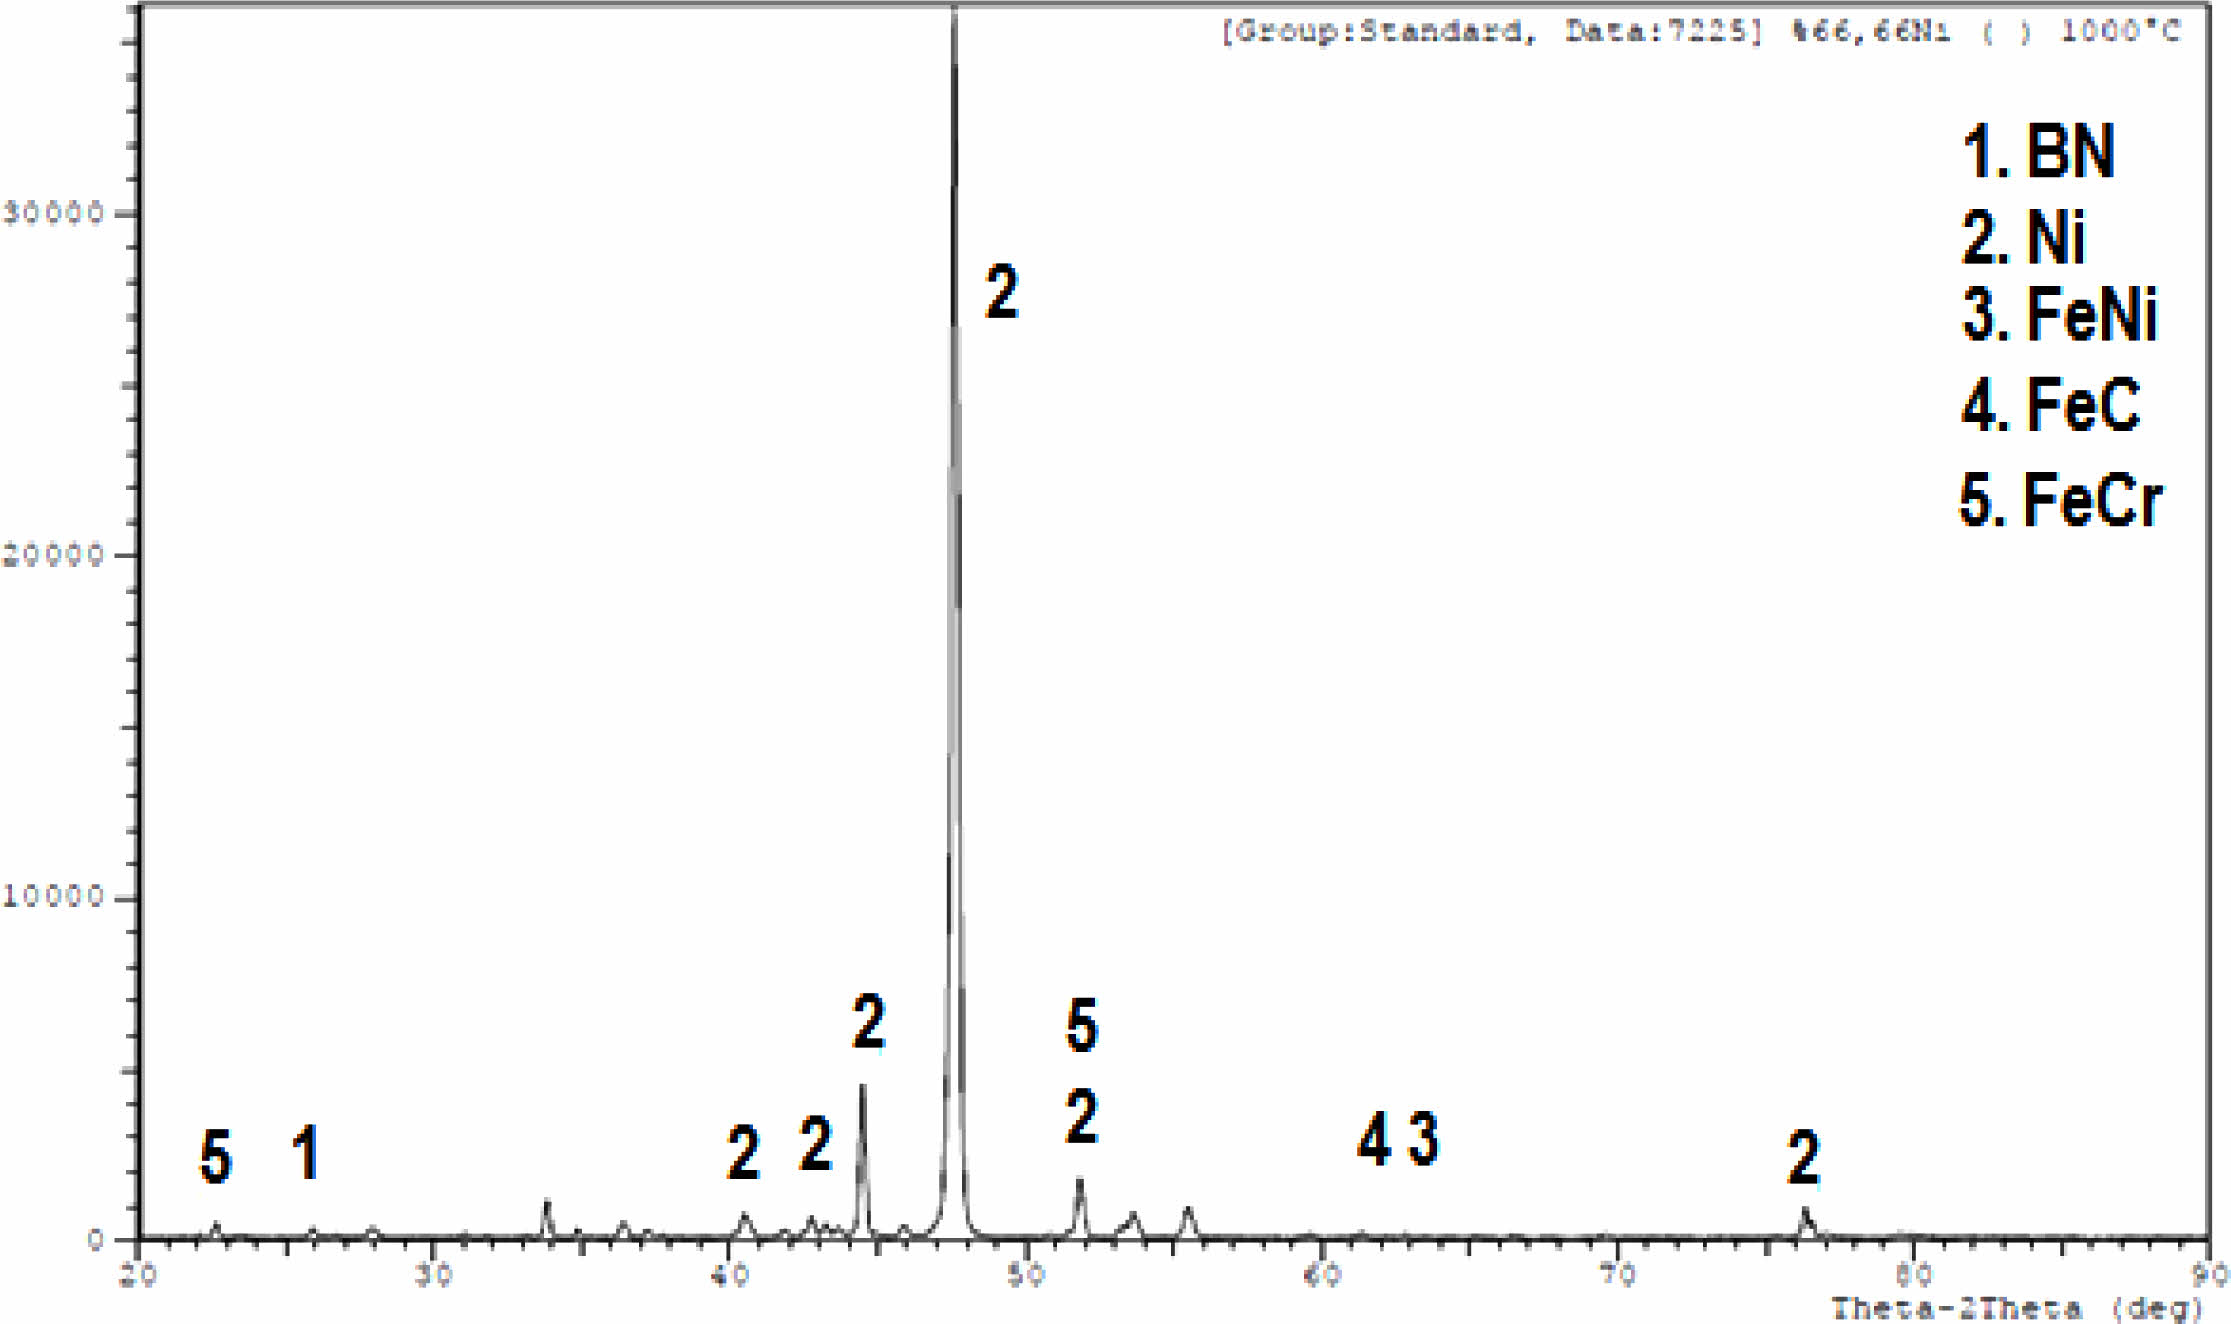
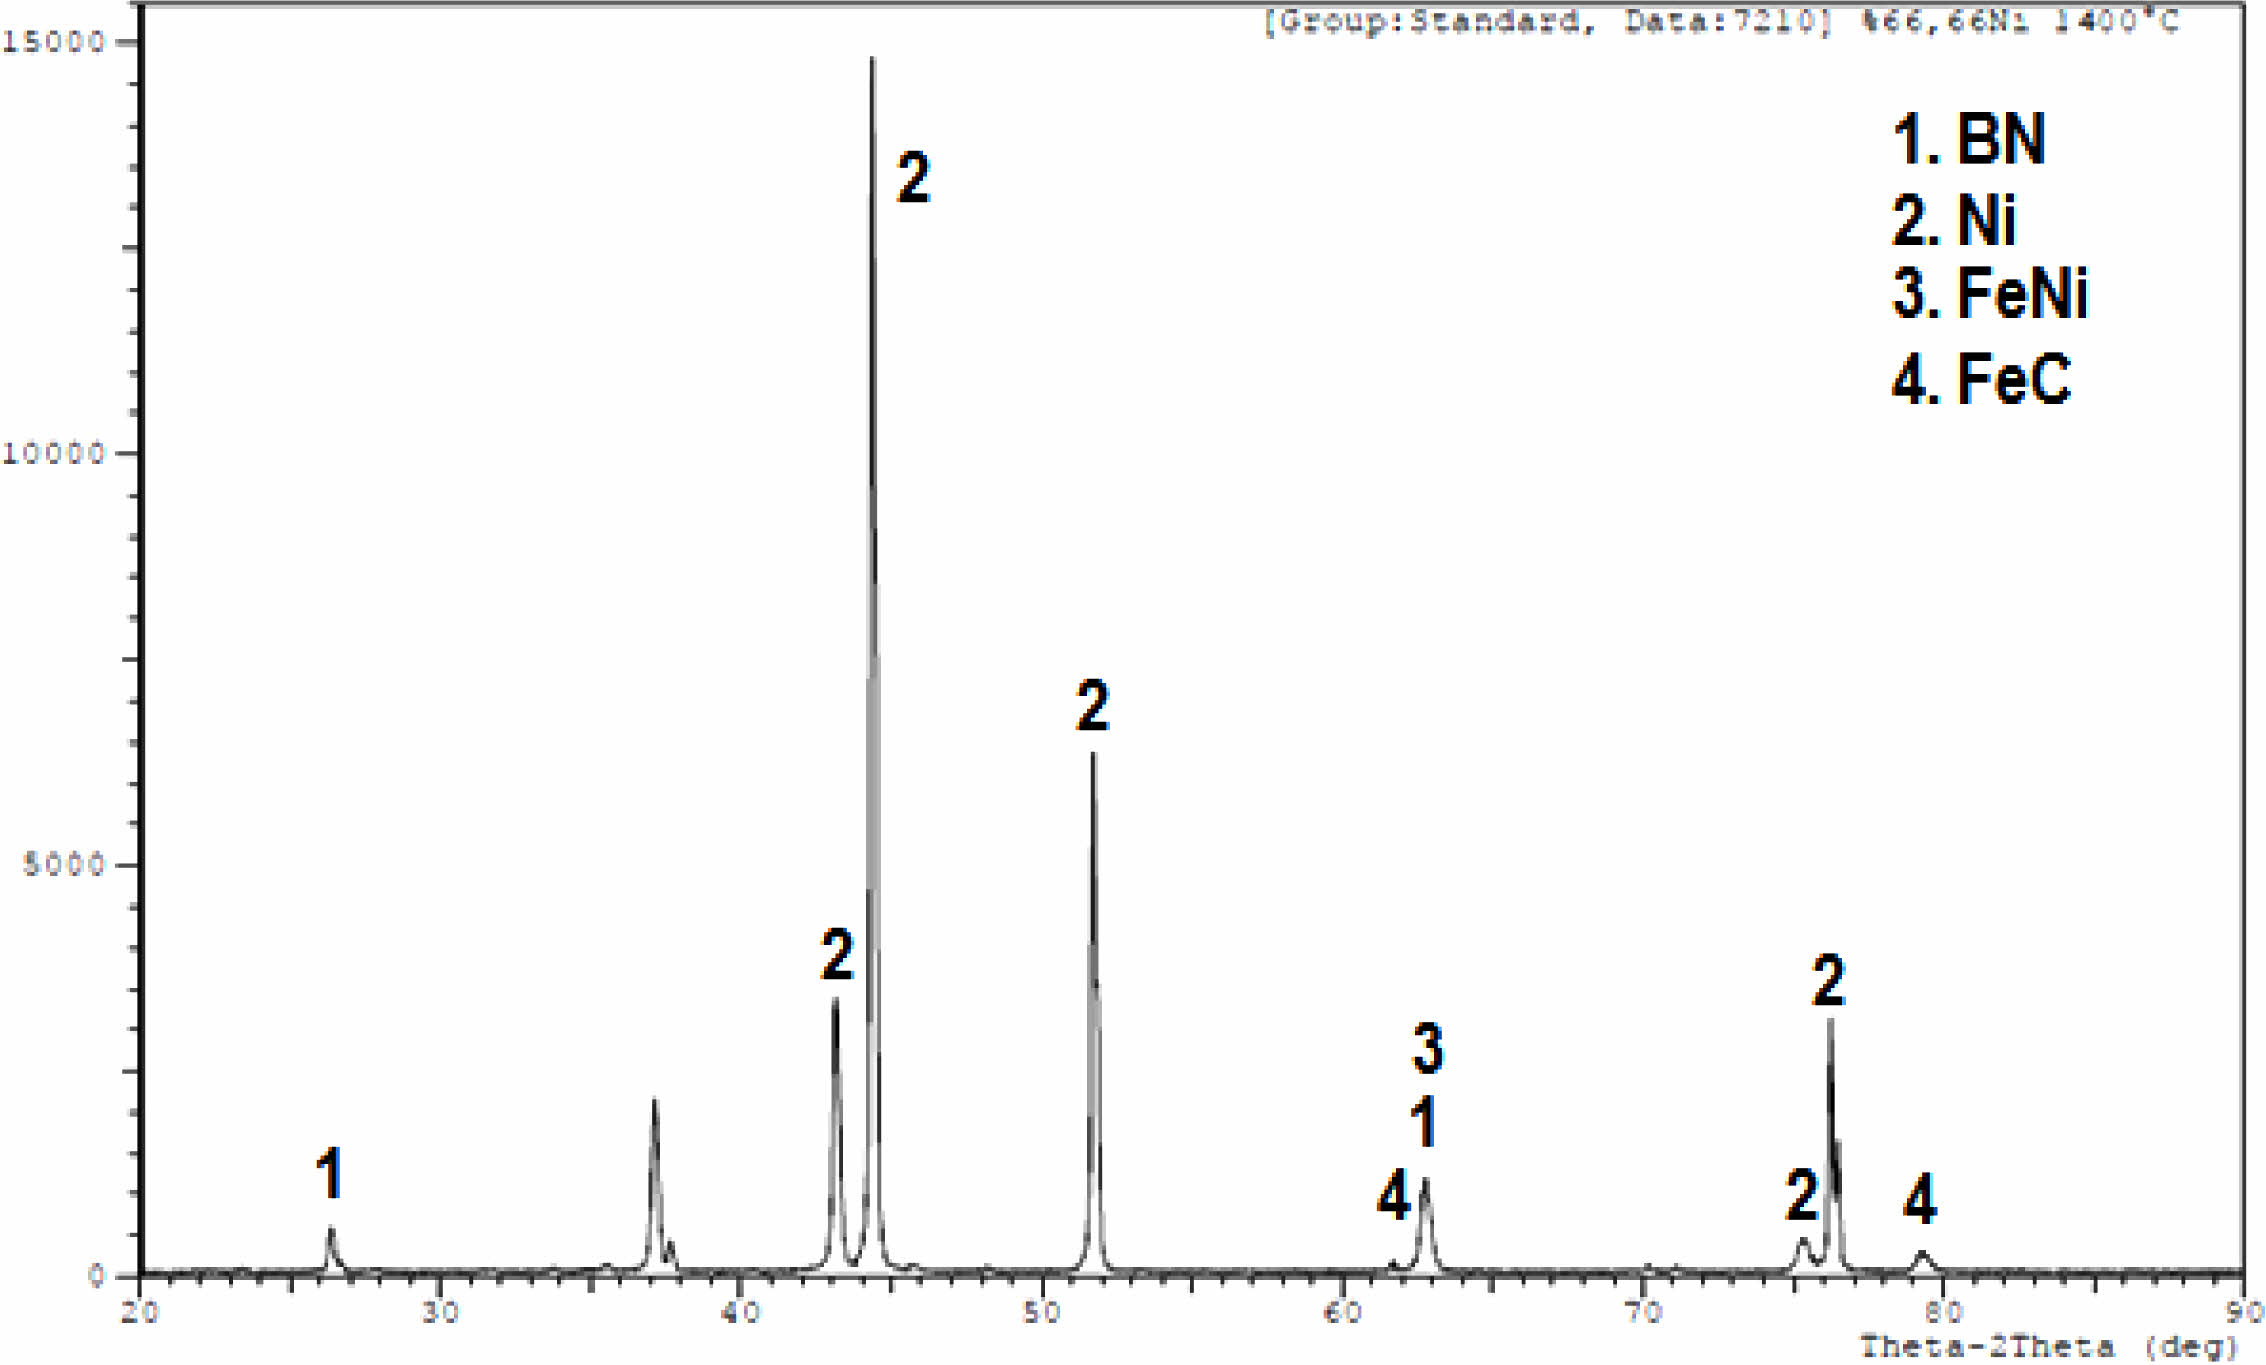
X-ray phase analysis was performed at the lowest and highest temperature. Because a different phase is not expected in close temperature ranges. In addition, when Fig. 4 and Fig. 5 are compared, it is seen that different phases emerge at a temperature of 1400 °C, that is, as the temperature increases. The peak densities obtained in X-ray analysis of the composite produced after sintering of 0.4% BN + 27.07% Astaloy-CrM composition at 1400 °C were higher than at 1000 °C. It confirms the mechanical properties of the produced composites and the results obtained in ultrasonic analysis. The phases revealed in the XRD analysis of the (0.4% BN ceramic + 27.07% Astaloy CrM metallic) + 72.53% Ni composite produced after the nickel plating process revealed that the coating process had taken place. When the XRD analysis results were evaluated, XRD analysis was applied to the produced samples to determine the phases formed. Peaks of Ni, BN, FeNi, FeC and FeCr phases were obtained in the sample produced at 1000 °C.
Peaks of Ni, BN, FeNi and FeC phases were obtained in the sample produced at 1400 °C. Considering the phases and precipitates formed in the composite sample, which was sintered at 1400 °C and has a high density, it is expected that the hardness value is high at this temperature. This means that the strength of the internal structure is better than the others.
Ultrasonic Properties and Hardness
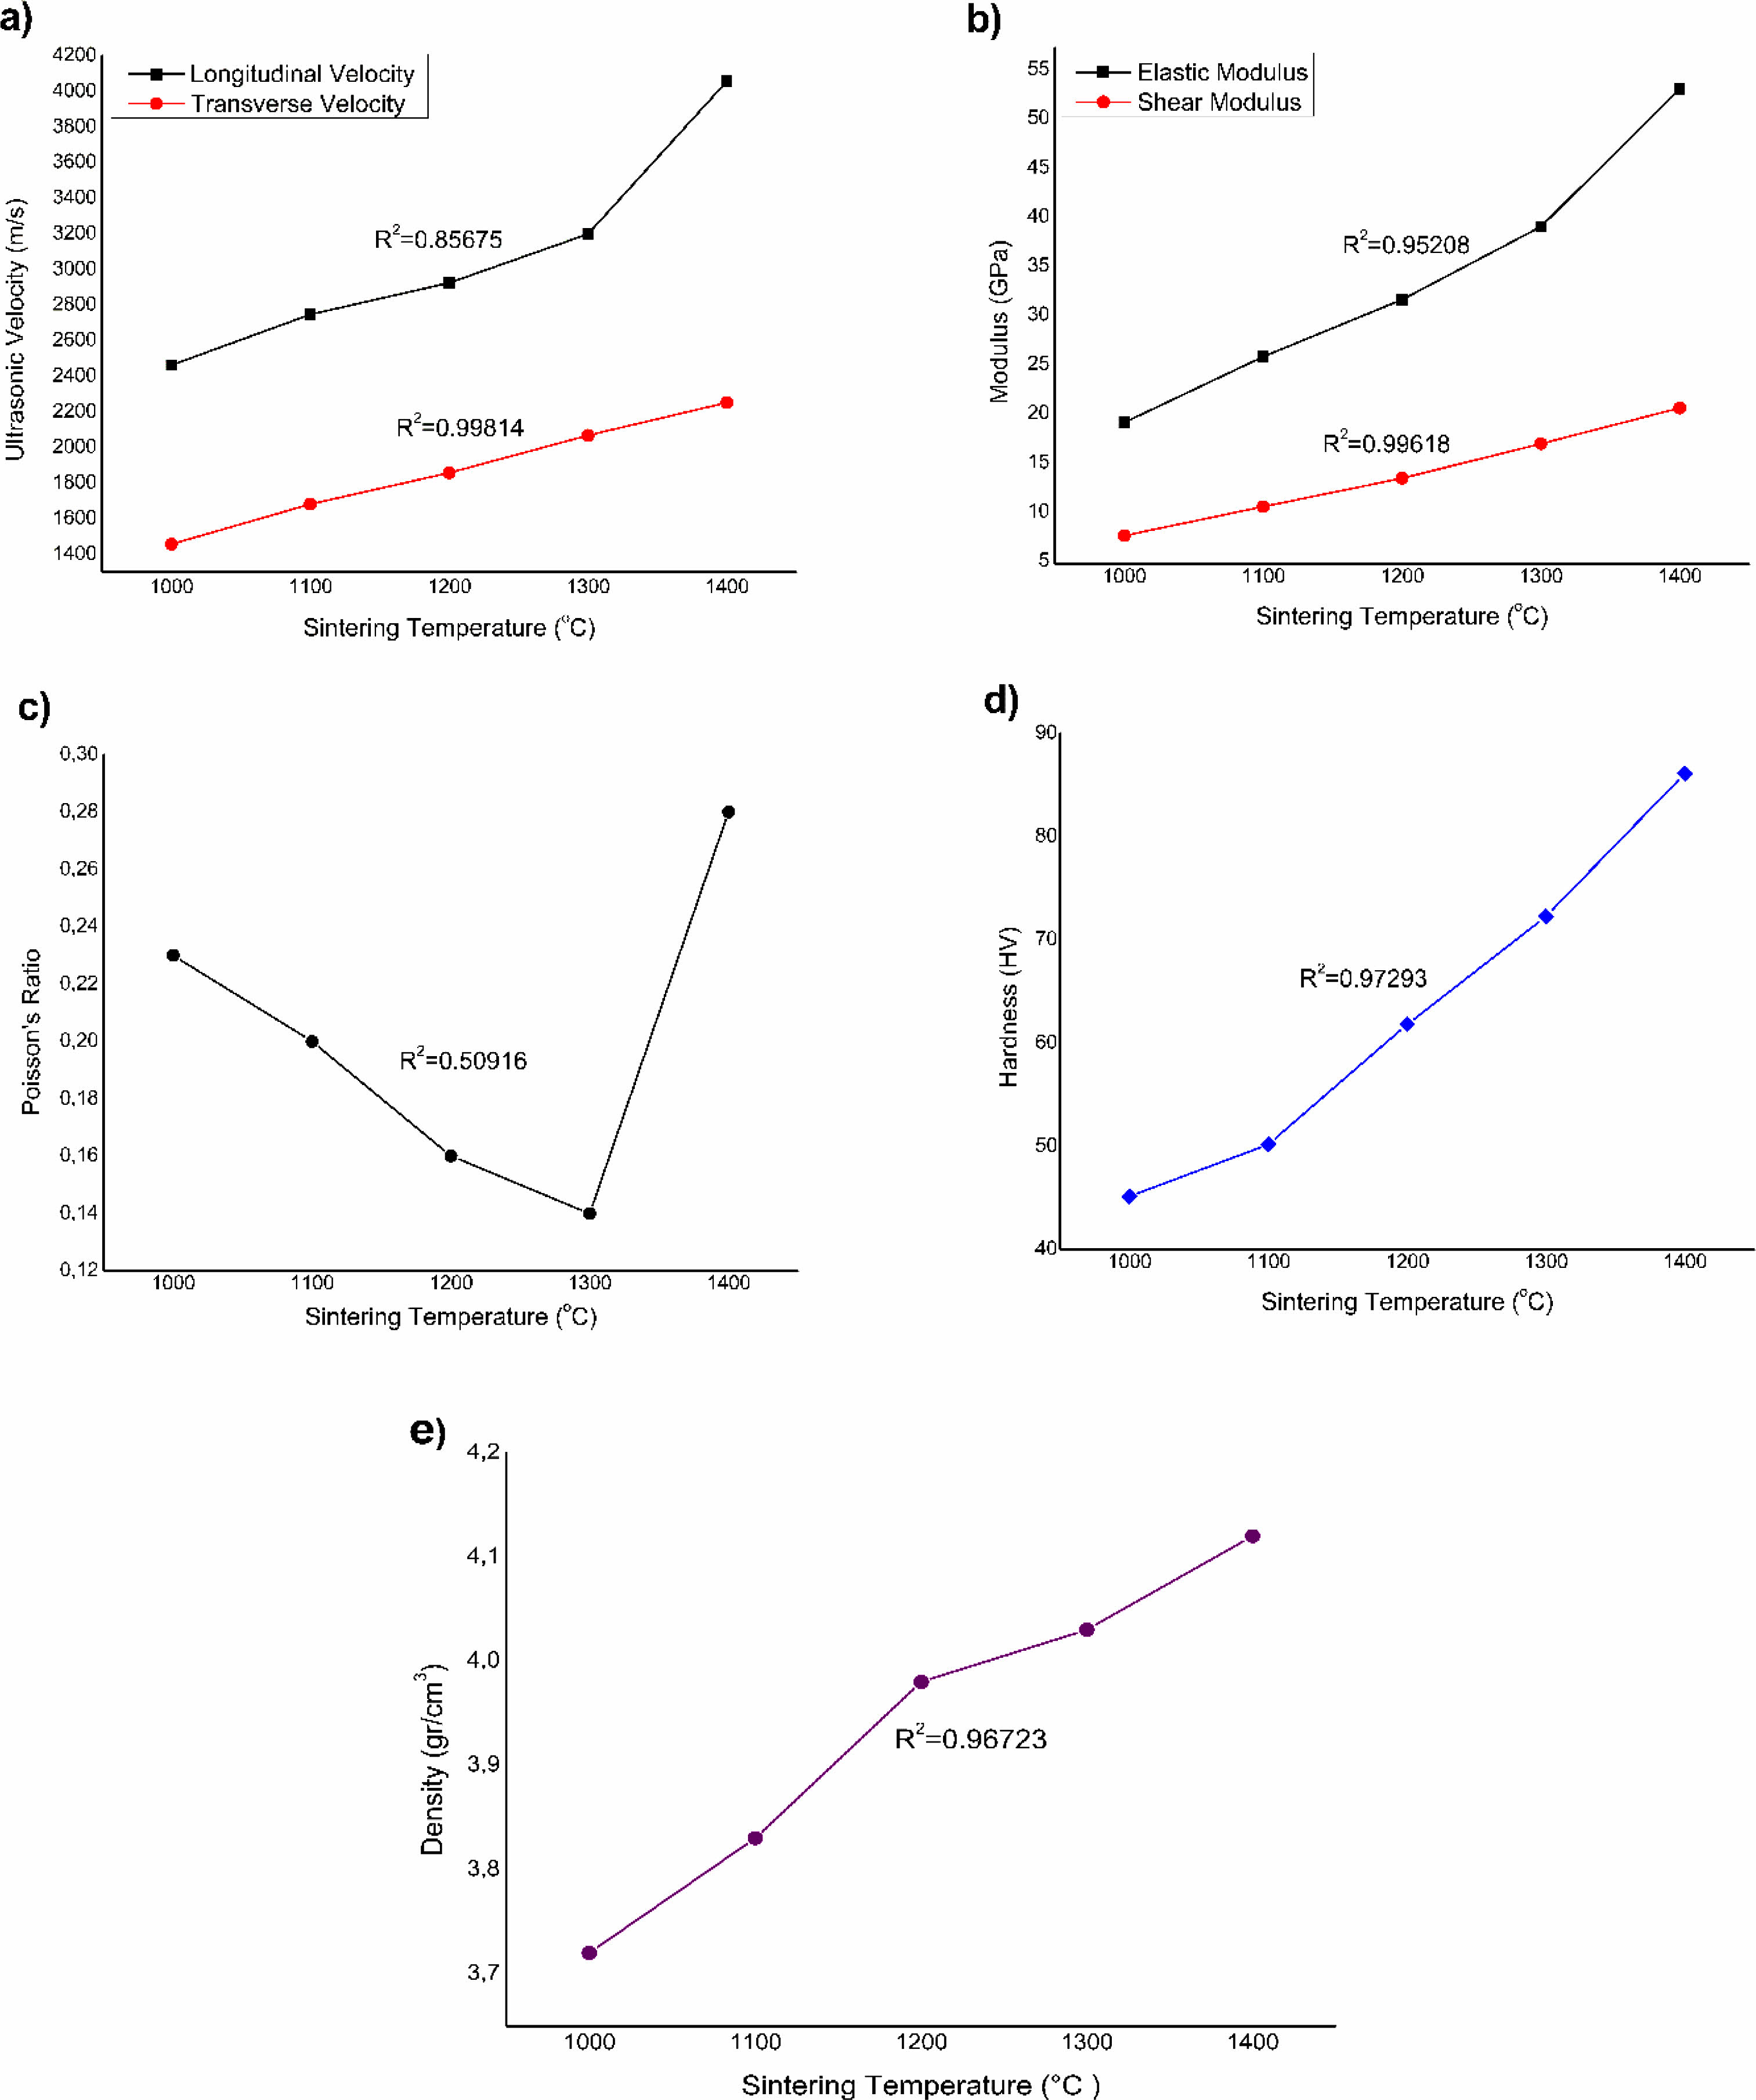
The measurement results of ultrasonic longitudinal and transverse wave velocities, Young's modulus, shear modulus and Poisson's ratio of sintered composite samples are shown in Table 2. Calibration curves (ultrasonic velocities-sintering temperature, elastic modulus-sintering temperature, shear modulus-sintering temperature, Poisson's ratio-sintering temperature, density-sintering temperature) are plotted in Fig. 6. It is seen that both ultrasonic longitudinal and shear wave velocities increase as the sintering temperature increases. It was determined that as the particles of the samples grew, the ultrasound velocities increased in direct proportion. In this case, it shows us that there is a linear relationship between particle size and ultrasound velocity. The Young and shear modulus of a material depend on the material's temperature and ultrasonic velocity. When the temperature of the material increases, the atomic vibrations in the crystal structure also increase. This increase in grain growth and atomic vibration with increasing sintering temperature decreases the atomic distances in the crystal and increases with atomic force. When the results are examined, the propagation velocity of ultrasonic waves, Young and shear modulus values increase linearly as the sintering temperature changes, while the Poisson ratio values decrease approximately (Figs. 6a, 6b and 6c). When any tensile stress is applied to a material, the material stretches in the direction of the applied force and contracts at the same time in the transverse/lateral direction. In this case, tension occurs in both directions. That is, the ratio of the strain occurring in the transverse direction to the strain occurring in the direction of tensile stress is called the Poisson ratio. Using a material's Poisson's ratio, there is a clearly known relationship between Modulus of Stiffness and Modulus of Elasticity for materials that exhibit the same properties in all directions. While the hardness value and density of the composite increase in direct proportion with the sintering temperature, the Poisson ratio decreases with the sintering temperature. The increase in sintering temperature results in a more rigid structure, with the metal powder particles becoming soft and ductile at higher sintering temperatures, which increases the contact area and slightly reduces the void size. In Fig. 6c, the Poisson ratio decreases approximately as the sintering temperature increases. There is a sudden sharp increase in temperature of 1400 °C. This means that a material's Poisson ratio of exactly 0.29 means that it is an incompressible isotropic material and will deform elastically at small stresses. As the hardness increases, the brittleness increases and accordingly the shaping becomes more difficult. In this case, it has been determined that the sintering temperature is one of the most effective factors on the propagation velocity of ultrasonic waves, the elastic and shear modulus, and the Poisson ratio.
As seen in Fig. 6e, the density of the composite increases with increasing sintering temperature. The curve shows a linear variation close to linear. The highest sintered density value for (0.4% BN ceramic + 27.07% Astaloy CrM metallic) + 72.53% Ni composite was calculated as 4.12 g/cm3.
The nickel (Ni) grains that precipitate during sintering form necks, increasing the interaction of grains with each other and allowing them to stick.
It causes the density to increase by closing the existing pores between the particles. Nickel (Ni) phase, which is constantly present in the internal structure during the high temperature stage of the sintering process, causes rapid density increase and grain growth.
It is thought that the increase in density to be achieved by rearranging the particles with the help of capillary forces applied to the solid particles by the liquid wetting the solid initially depends on the amount of Nickel phase formed, the particle size and the decrease in the amount of pores. The effect of sintering temperature on mechanical properties was determined by measuring the hardness of the samples (Fig. 6d). As seen in Fig. 6d, the lowest hardness value of the composite (0.4% BN ceramic + 27.07% Astaloy CrM metallic) + 72.53% Ni sintered for 2 hours at 1000 °C and 1400 °C, respectively, was 45.14 HV and the highest hardness was 86.12 HV. The increase in hardness value showed promise for relatively high hardness composite materials with limited ductility. The values obtained as a result of the experiments show that the hardness of nickel-based composite samples increases with the sintering temperature. Ceramic metal powders prepared in 0.4% BN + 27.07% Astaloy-CrM composition were coated using electroless Ni coating technique before sintering. The coating process improves the mechanical properties of the composite, especially by facilitating the bonding of ceramic powders. The use of Hydrazine in the electroless Ni plating bath provided both pure Ni and unchanged composition. Electroless Ni coating process provides the improvement of mechanical properties both before and after sintering. Finding the Ni phase in the X-ray analysis of the (0.4% BN ceramic + 27.07% Astaloy CrM metallic) + 72.53% Ni composite sample after the nickel plating process shows that the coating process has taken place, and Ni+X new phase formations have occurred.
|
Fig. 2 SEM image of (0.4% BN ceramic + 27.07% Astaloy CrM metallic) + 72.53% Ni of the sample sintered at 1000 ºC. |
|
Fig. 3 SEM image of (0.4% BN ceramic + 27.07% Astaloy CrM metallic) + 72.53% Ni of the sample sintered at 1400 ºC. |
|
Fig. 4 XRD analysis of sample sintered at 1000 ºC. |
|
Fig. 5 XRD analysis of sample sintered at 1400 ºC. |
|
Fig. 6 The relationship between sintering temperature and the ultrasonic-mechanical properties of composite samples |
Another advantage of the coatings made with electroless nickel plating method is that it allows the powder surfaces to be coated homogeneously and in equal thickness. The biggest advantage of electroless nickel plating is that apart from providing an equal coating on the entire surface of a part, the powders are homogeneous in size at the end of the coating process and provide corrosion resistance, less porosity and high hardness. Electroless nickel plating is the catalytic reduction of nickel ions in an aqueous solution of a chemical reducer. This process is the accumulation of nickel in the form of precipitation above the amount to be coated. The following results were obtained from experimental tests.
In the study, ultrasonic pulse echo technique was used effectively for the characterization of (0.4% BN ceramic + 27.07% Astaloy CrM metallic) + 72.53% Ni composite properties. As a result of the tests (0.4% BN ceramic + 27.07% Astaloy CrM metallic) + 72.53% Ni composite, it was observed that the ultrasonic longitudinal and transverse velocity values increased with the increase of the sintering temperature values. This is an indication that there is no loss of sound waves while moving in the structure. shows the formation of denser and larger granular structures.Young's modulus and shear modulus values also increased with the increase in ultrasonic wave velocities. Shear modulus is also expressed as the stiffness modulus. The higher the shear modulus of a material, the higher the stiffness modulus, the deformation of that material, it is harder, that is, it is more rigid and more prone to maintain its original state. It shows more resistance to deformation. It does not exhibit a ductile behavior and sudden fractures may occur. This is the case with the experimental results we obtained with the shear modulus, Young's modulus, Poisson ratio, hardness and density values compatible with the results.
Since the temperature change causes a change in the internal structure of the material, it was observed that the porosity decreased with increasing sintering temperature and grain growth. It is also believed that less porosity, formed phases and precipitates are responsible for the high density.
This research was supported by Afyon Kocatepe University's 17.KARIYER.162 project. We thank the Scientific Research Coordination Unit.
- 1. P. Morampudi, V.S.N.-V. Ramana, C. Prasad, K. SriramVikas, and Rahul, Mater. Today: Proc. 59 [3] (2022) 1708-1713.
-

- 2. B. Oraon, G. Majumdar, and B. Ghosh, Mater. Des. 27[10] (2006) 1035-1045.
-

- 3. C. A. Loto, Silicon 8 (2016) 177-186.
-

- 4. W. Shang, X. Zhang, Y. Wen, Y. Li, Z. Zhang, F. Wu, and C. Wang, Chem. Eng. Sci. 207 (2019) 1299-1308.
-

- 5. C. Liu, Y. Yin, C. Li, R. Li, and Q. Chen, Wear 488-489 (2022) 204164.
-

- 6. B. Wei, Z. Liu, Y. Ai, B. Cao, S. Ye, J. Li, and H. Zhou, J. Alloys Compd. 903 (2022) 163728.
-

- 7. Z. Shao, Z. Cai, R. Hu, and S. Wei, Surf. Coat. Technol. 249 (2014) 42-47.
-

- 8. J. Song, Y. Liu, C. Wu, X. Yang, H. Luo, C. He, C. Li, and H. Yang, J. Ceram. Process. Res. 21[2] (2020) 143-147.
-

- 9. A. Yönetken, Eskişehir Technical Univ. J. of Sci. and Tech. A - Appl. Sci. and Eng. 21[1] (2020) 49-57.
-

- 10. C. Hongyu, W. Zhaocheng, L. Laima, Z. Liu, T. Zhibia, and W. Yucheng, Rare Metal Mat. Eng. 46[10] (2017) 2820-2824.
-

- 11. J. Sudagar, J. Lian, and W. Sha, J. Alloys Compd. 571 (2013) 183-204.
-

- 12. R. Gerosa, B. Rivolta, A. Tavasci, G. Silva, and A. Bergmark, Eng. Fract. Mech. 75 (2008) 750-759.
-

- 13. M. Teimouri, M. Ahmadi, N. Pirayesh, M. Aliofkhazraei, M.M. Khoee, H. Khorsand, and S. Mirzamohammadi, J. Alloys Compd. 477[1-2] (2009) 591-595.
-

- 14. S. Mansoorzadeh and F. Ashrafizadeh, Surf. Coat. Technol. 192[2-3] (2005) 231-238.
-

- 15. T. Pieczonka, M. Sułowski, and A. Ciaś, Arch. Metall. Mater. 57[4] (2012) 1001-1009.
-

- 16. M. Sułowski, P. Kulecki, and A. Radziszewska, Arch. Metall. Mater. 59[4] (2014) 1507-1512.
-

- 17. S. Mansoorzadeh and F. Ashrafizadeh, Surf. Coat. Technol. 192[2-3] (2005) 231-238.
-

- 18. Y. Liu, Y. Song, X. Li, C. Chen, and K. Zhou, Ultrasonics 81 (2017) 167-173.
-

- 19. H. Jeong and D.K. Hsu, NDT&E Int. 29[2] (1996) 95-101.
-

- 20. N.B. Podymova, I.E. Kalashnikov, L.K. Bolotova, and L.I. Kobeleva, Ultrasonics 99 (2019) 105959.
-

- 21. P.N. Bindumadhavan, H.K. Wah, and O. Prabhakar, Mater. Sci. Eng. A 323[1-2] (2002) 42-51.
-

- 22. S.B. Teodorovich, Russ. J. Nondestruct. Test. 39 (2003) 427-435.
-

- 23. M. Spies and K. Salama, Res. Nondestr. Eval. 1 (1989) 99-109.
-

- 24. C.H. Gür, Mater. Sci. Eng. A 361[1-2] (2003) 29-35.
-

- 25. A.A. El-Daly, M. Abdelhameed, M. Hashish, and A.M. Eid, J. Alloys Compd. 542 (2012) 51-58.
-

- 26. A.A.M. Yassene, S. Fares, A. Ashour, and M. El-Rahman, Res. Nondestruct. Eval. 29[1] (2018) 48-60.
-

- 27. D. Jia, G. Bourse, S. Chaki, M.F. Lacrampe, C. Robin, and H. Demouveau, Res. Nondestr. Eval. 25[1] (2014) 20-29.
-

- 28. I. Bolotina, M. Dyakina, M. Kröning, F. Mohr, K.M. Reddy, A. Soldatov, and Y. Zhantlessov, Russ. J. Nondestruct. Test. 49[3] (2013) 145-158.
-

- 29. C.P. Hagan, J.F. Orr, C.A. Mitchell, and N.J. Dunne, Ultrasonics 56 (2015) 279-286.
-

- 30. G. Zhang, X. Li, and T. Kundu, Measurement 177 (2021) 109270.
-

- 31. S.-J. Bang, D.-G. Song, and K.-Y. Jhang, NDT & E Int. 133 (2022) 102757.
-

- 32. G.L. Petersen, B.B. Chick, and C.M. Fortunko, NDT&E 8-9[1-6] (1992) 847-856.
-

- 33. Z. Shanpu, Z. Sai, L. Ying, X. Baiqiang, and H. Wenfeng, NDT&E 36[5] (2021) 515-527.
-

- 34. V.I.A. Freitas, V.H.C. Albuquerque, E.M. Silva, A.A. Silva, and J.M.R.S. Tavares, Mater. Sci. Eng. A 527[16-17] (2010) 4431-4437.
-

- 35. S. Mondal and D. Datta, Russ. J. Nondestruct. Test. 58[11] (2022) 971-982.
-

- 36. Y.Q. Wang, Y.P. Li, H.B. Liu, X. Zhang, Y.K. Liu, and T.R. Liu, Mater. Eval. 77[5] (2019).
- 37. H. Hiroaki, K. Yutaka, I. Nobukazu, H. Masahiro, and T. Minoru, NDT&E 20[2] (2005) 115-124.
-

- 38. K. Ashok, K. Yudhisther, and K. Basant, NDT&E 13[2] (1997) 121-126.
-

- 39. B.-K Jang, S.-H. Kim, C.A.J. Fisher, and H.-T. Kim, Mater. Today Commun. 31 (2022) 103330.
-

- 40. A. Simon, G. Lefebvre, T. Valier-Brasier, and R. Wunenburger, J. Acoust. Soc. Am. 146[5] (2019) 3131-3140.
-

- 41. A.M. Harryparsed-Daniel, O.O. Blake, and R. Ramsook, Appl. Geophys. 198 (2022) 104557.
-

- 42. M. Toozandehjani, F. Ostovan, M. Shamshirsaz, K.A. Matori, and E. Shafiei, J. Mater. Res. Technol. 15 (2021) 2529-2542.
-

- 43. J.J. Wortman and R.A. Evans, J. Appl. Phys. 36 (1965) 153-156.
-

- 44. S.K. Najafi, V. Bucur, and G. Ebrahimi, Mater. Lett. 59[16] (2005) 2039-2042.
-

- 45. B. Grelsson and K. Salama, Res. Nondestruct. Eval. 2[2] (1990) 83-96.
-

- 46. H. Carreon, M. Carreon-Garcidueñas, and M.L. Carreon, Phys. Mesomech. 23 (2020) 32-38.
-

- 47. B.K. Kardashev, V.I. Betekhtin, and M.V. Narykova, Tech. Phys. 64 (2019) 1480-1483.
-

- 48. D. Ravinder, Mater. Lett. 47[1-2] (2001) 35-39.
-

- 49. Z. Yang, L. Zheng, Z. Jinjie, and Z. Zongjian, Res. Nondestruct. Eval. 32[1] (2021) 38-57.
-

- 50. T. Matsumoto, T. Nose, Y. Nagata, K. Kawashima, T. Yamada, H. Nakano, and S. Nagai, J. Am. Ceram. Soc. 84[7] (2004) 1521-1525.
-

- 51. H. Carreón, G. Barrera, C. Natividad, M. Salazar, and A. Contreras, Nondestruct. Test. Evaluation 31[2] (2016) 97-108.
-

- 52. H. Tanaka, L. Feng Qun, O. Munekata, T. Taguchi, and T. Narita, Mater. Trans. 46[6] (2005) 1271-1273.
-

- 53. F. Uzun and A.N. Bilge, Mater. Eval. 75[12] (2017) 1489-1496.
- 54. H. Mohrbacher and K. Salama, Res. Nondestruct. Eval. 4[3] (1992) 139-150.
-

- 55. R. Fenn and J.J. Wooton, Nondestruct. Test. Commun. 2[4] (1986) 115-126.
-

- 56. V.N. Kozlov, A.A. Samokrutov, and V.G. Shevaldykin, Nondestruct. Test. Evaluation 13[2] (1997) 73-84.
-

- 57. J. Dawei, G. Bourse, S. Chaki, M.F. Lacrampe, C. Robin, and H. Demouveau, Res. Nondestruct. Evaluation 25[1] (2014) 20-29.
-

- 58. A.E. Pramono, M.Z. Nura, J.W.M. Soedarsono, and N. Indayaningsih, J. Ceram. Process. Res. 20[4] (2019) 333-346.
-

- 59. Z. Xu, Y. Zhang, B. Wang, J. Yang, and K. Liu, J. Ceram. Process. Res. 17 (2016) 840-844.
-

- 60. J. Song, L. Chen, C. Pang, J. Zhang, W. Shi, S. Guo, X. Wang, and M. Xu, J. Ceram. Process. Res. 19[1] (2018) 11-14.
-

- 61. Y. Liu, X. Yang, K. Peng, O. Wang, J. Huang, Z. Zhang, J. Lu, H. Xu, J. Song, and L. Chen, J. Ceram. Process. Res. 20[4] (2019) 436-441.
-

 This Article
-
2023; 24(5): 772-780
Published on Oct 31, 2023
- 10.36410/jcpr.2023.24.5.772
- Received on Apr 10, 2023
- Revised on Aug 12, 2023
- Accepted on Aug 26, 2023
 Services
- Abstract
introduction
materials and method
results and discussion
conclusion
- Acknowledgements
- References
- Full Text PDF
Shared
 Correspondence to
- Ahmet Yönetken
-
Afyon Kocatepe University, Faculty of Technology, Mechatronics Engineering, 03200 Afyonkarahisar, Turkey
Tel : +90 272 218 25 10 Fax: +90 272 218 26 93 - E-mail: yönetken@aku.edu.tr



 Copyright 2019 International Orgranization for Ceramic Processing. All rights reserved.